| How-To Document
Build a File Upload and
Download Application
Date: 16-Aug-2004
After completing this
How-To, you should be able to:
- build an interface to
upload files in Oracle HTML DB
- create a report on
uploaded files with a link to download the file
- create a custom table
to store additional attributes about the uploaded
document
- move the uploaded
document to the custom table
- provide a link to
download the document from the custom table
Table of Contents
Introduction
Accomodating file upload and
download in your Oracle HTML DB applications is only a
matter of creating a form and report with links. This
document will describe how to create the form and report
with links for file upload and download. The document
also describes how to create your own table to store
additional attributes about the documents, how to move
the actual document to your custom table, and finally
how to create the mechanism to download the document in
your custom table.
The procedures below assume that
you have already created an application using the Create
Application Wizard, and that the upload form will be
placed on page 2 of the application.
Software Requirements
- Oracle HTML DB
- Netscape 7.0 or Internet Explorer
5.5 or later Web browser
Create the Upload
Form
The first step is to create the
form to upload documents. The form is a region of type
HTML that consists of a file upload item and a button.
The button submits the page and returns the user to the
same page.
To create the file upload
form:
- Navigate to the Page Definition of page 2.
- Under Regions, click Create.
- As in figure 1, in the Create Region Wizard:
- From the region type list, select HTML.
- Enter a Region Title such as Submit
File.
- Continue accepting defaults.
- Click Create
Region.
- Under Items, click Create.
- As in figure 2, in the Create Item Wizard:
- For Item Name enter P2_FILE_NAME.
- From the Display As list, select File Browse....
- Continue to accept the defaults.
- Click Create
Item.
- Under Buttons, click Create.
- As in figure 3 and 4, in the Create Button Wizard:
- From the Task list, select Create a button in a
region position.
- To fill in the button name and label, under
Button Name click [Submit].
- When asked for Branch to Page, enter 2.
- Click Create
Button.
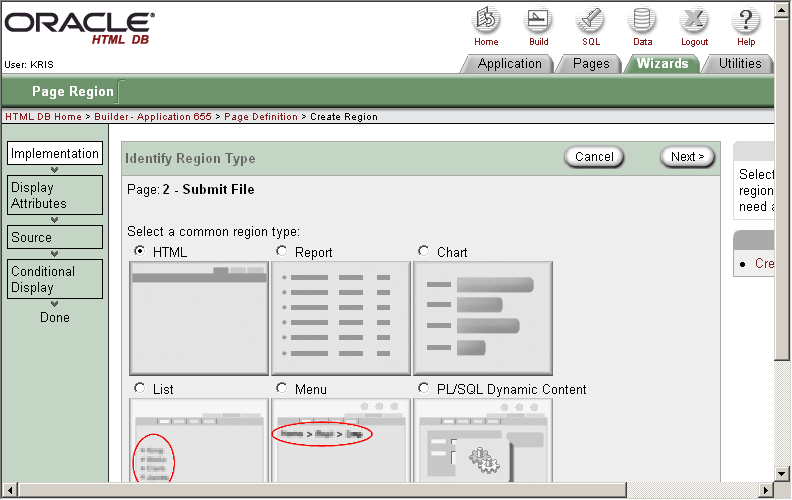
Figure 1: Select Region
Type
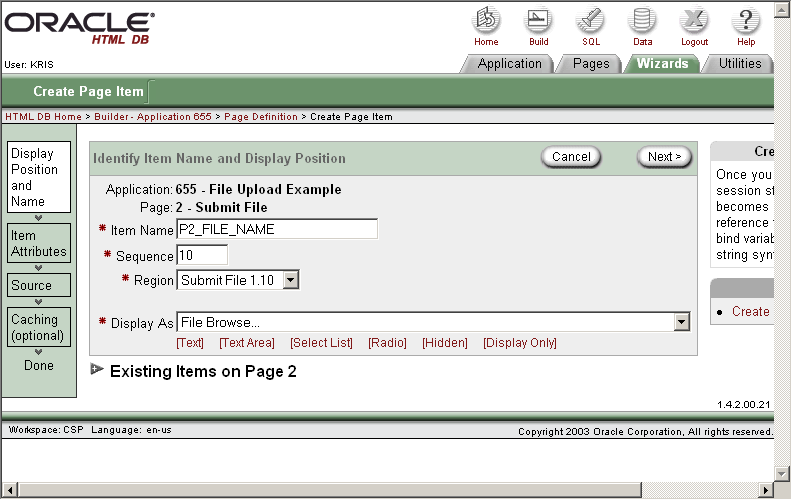
Figure 2: Create
Item
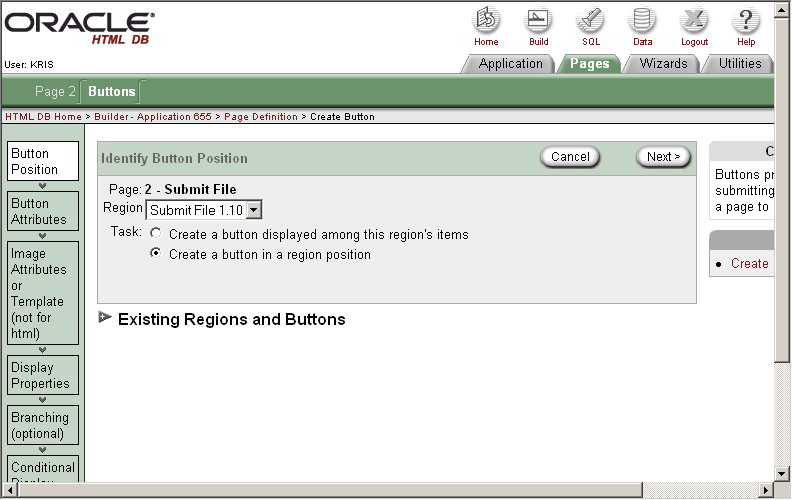
Figure 3: Create
Button
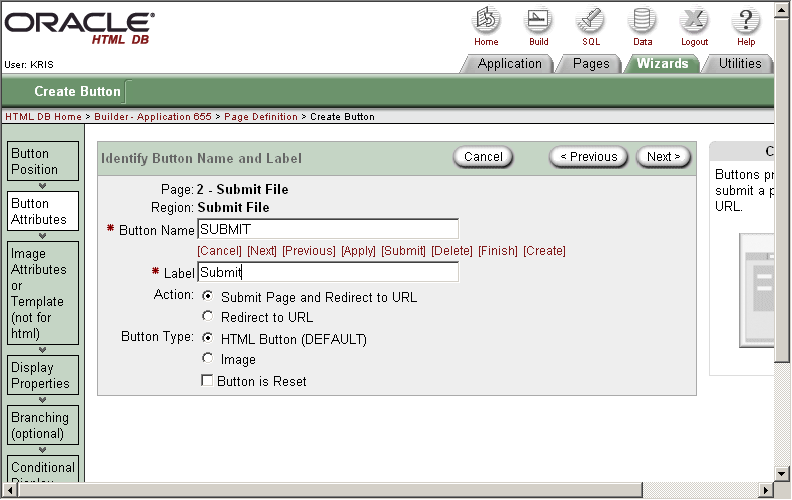
Figure 4: Create
Button2
When you run the page you
created, it should look similar to the figure that
follows.
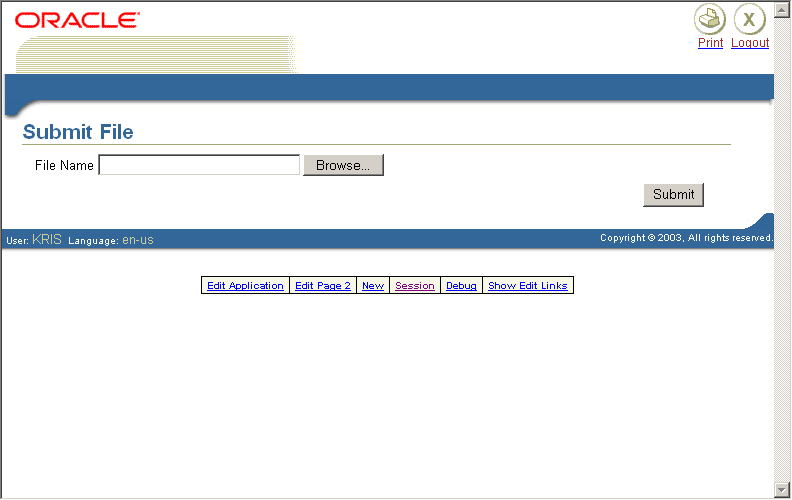
Figure 5: Completed Upload
Form
Create a
Report with Download Links
Now that you have created the
form to upload documents, you create a report on the
document table with a link to download the document.
When you use the file upload item type, the files you
upload are stored in a table called wwv_flow_files.
Every workspace has access to this table through a view
called wwv_flow_files.
To create a report on
wwv_flow_files:
- Under Regions, click Create.
- In the Create Region Wizard:
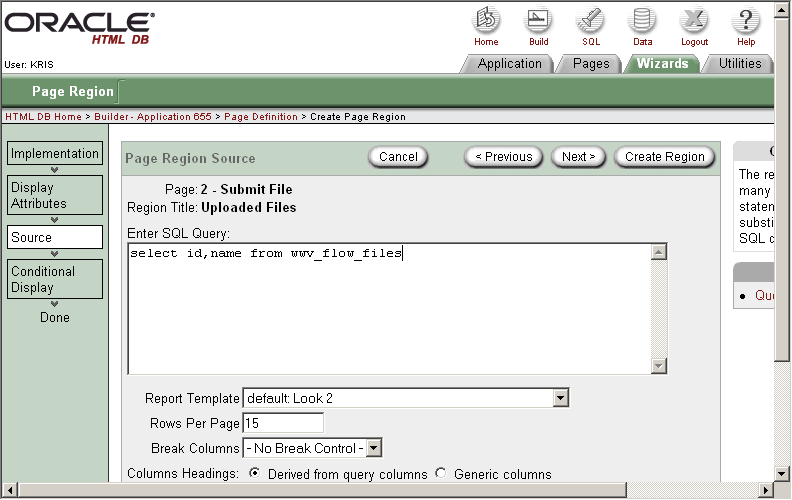
Figure 6: Create SQL
Region
The report you just created
shows all documents that have been uploaded. Next, you
provide a link to download the document. To provide a
link to download the documents in the report:
- Under Regions next to the report region you
created above, click Q.
- Next to the ID column, click the edit icon.
- Scroll down to the Column Link region.
- As shown in figure 7, in the Link Text field,
enter download.
- As shown in figure 7, in the URL field, enter
p?n=#ID#.
- Click Apply
Changes.
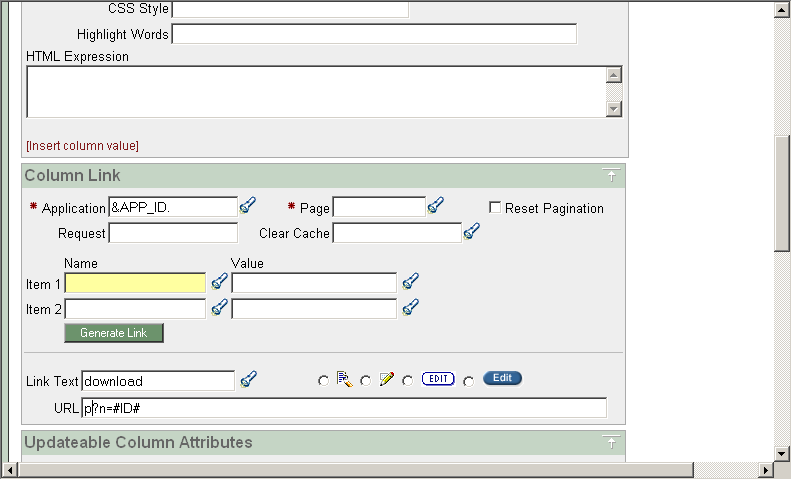
Figure 7: Create Download
Link
Run your application and it
should look similar to the following figure.
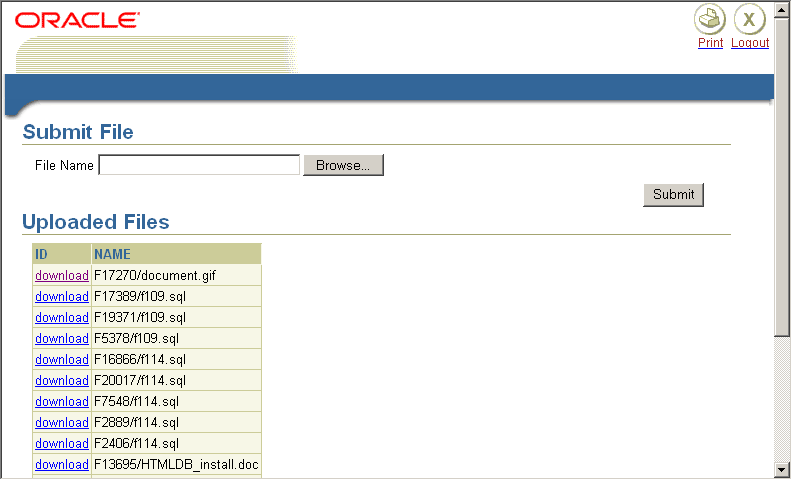
Figure 8: Report of Uploaded
Files with Download Link
Store
Additional Attributes About the Document
To store additional attributes
about the documents that are uploaded, you create
another table to store the information. Next, you add an
item to the upload form to capture the information. Add
a process to insert this information along with the name
of the file. Finally, alter the SQL Report of uploaded
files to join to the table containing the additional
information.
To create the table to store
additional information about uploaded files:
- Navigate to the SQL Workshop.
- Click SQL Command
Processor.
- In the SQL Statement field, enter
create table file_subjects(name varchar2(4000), subject varchar2(4000) );
- Click Run
SQL.
To create an item to capture the
subject of the document:
- Navigate to the Page Definition of page 2.
- Under Items, click Create.
- As in figure 9, in the Create Item Wizard:
- For Item Name enter P2_SUBJECT.
- From the Display As list, select Text Field.
- From the Region list, select the region that
holds the File Upload item.
- Continue to accept the defaults.
- Click Create
Item.
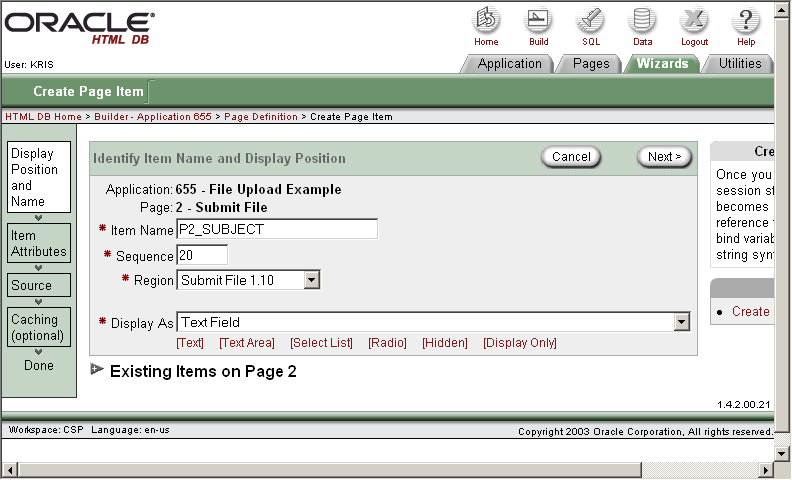
Figure 9: Create Text Item
for Document Subject
To create a process to insert
the subject information into the new table:
- On the Page Definition, under Page Processing in
the Processing region click Create.
- In the Create Process Wizard:
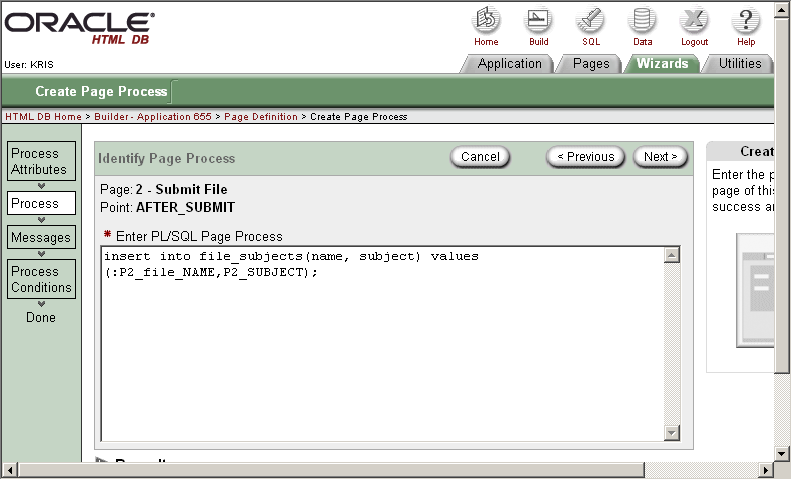
Figure 10: Create Process to
Insert Subject
To alter the SQL Report region
to join to the additional attributes table:
- Under Regions, click on the name of the uploaded
files report.
- Replace the Region Source with the following:
select w.id,w.name,s.subject from wwv_flow_files w,file_subjects s where w.name = s.name
- Click Apply
Changes.
Run the page and you see that
the Subject column is included as in the following
figure.
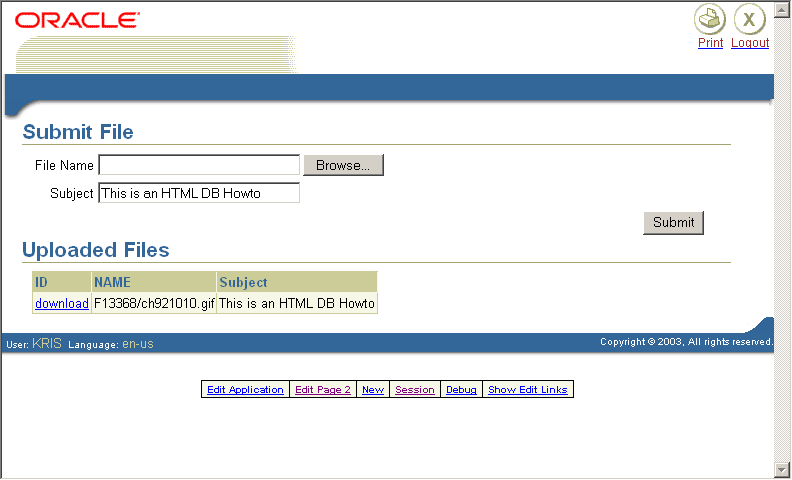
Figure 11: Report Including
Subject
Store the
Document in a Custom Table
Your application may require
that the document be stored in your custom table. This
is necessary if you want to create an Oracle Text Index
on the documents uploaded. In order to store the
documents in your custom table you need to add a column
of type BLOB to hold the document. You also need to
alter the process that inserts into the custom
table.
To add a BLOB column to the
file_subjects table:
- Navigate to the SQL Workshop.
- Click SQL Command
Processor.
- In the SQL Statement field, enter
alter table file_subjects add(id number,blob_content BLOB,mime_type varchar2(4000) );
- Click Run
SQL.
To alter the process to insert
the document into the file_subjects table:
- Navigate to the Page Definition of page 2.
- Under Page Processing in the Processing region
click the name of the process you created to insert
into the custom table.
- Under source, replace the process with the
following:
    if ( :P2_FILE_NAME is not null ) then
     insert into file_subjects(id,NAME, SUBJECT, BLOB_CONTENT, MIME_TYPE)
        select id,:P2_FILE_NAME,:P2_SUBJECT,blob_content,mime_type
            from wwv_flow_files where name = :P2_FILE_NAME;

   delete wwv_flow_files where name = :P2_FILE_NAME;
  end if;
- Click Apply
Changes
Download the Document from the
Custom Table
Now that the documents are being
stored in your custom table, you need to provide a way
to download them. You do this by creating a procedure
and granting execute on that procedure to the psuedo
user PUBLIC. Change the SQL report region to no longer
join to the wwv_flow_files table. You then change the
URL supplied for the ID column in the SQL report to
execute the new procedure instead of executing the p
procedure.
To create a procedure to
download documents from the file_subjects table, and
grant execute to public:
- Navigate to the SQL Workshop.
- Click SQL Command
Processor.
- In the SQL Statement field, enter (or copy and
paste):
  CREATE OR REPLACE procedure download_my_file(p_file in number) as
	v_mime  varchar2(255);
	v_length  number;
	v_file_name varchar2(2000);
	Lob_loc  BLOB;
BEGIN
	select mime_type, blob_content, name,dbms_lob.getlength(blob_content)
		into v_mime,lob_loc,v_file_name,v_length
		from file_subjects
		where id = p_file;
              --
              -- set up HTTP header
              --
                    -- use an NVL around the mime type and
                    -- if it is a null set it to application/octect
                    -- application/octect may launch a download window from windows
                    owa_util.mime_header( nvl(v_mime,'application/octet'), FALSE );

                -- set the size so the browser knows how much to download
                htp.p('Content-length: ' || v_length);
                -- the filename will be used by the browser if the users does a save as
                htp.p('Content-Disposition: attachment; filename="' || v_file_name || '"');
		-- close the headers
                owa_util.http_header_close;
		-- download the BLOB
		wpg_docload.download_file( Lob_loc );
end download_my_file;
/
- Click Run
SQL.
- In the SQL Statement field, enter (or copy and
paste):
grant execute on download_my_file to public
/
- Click Run
SQL.
To change the SQL report region
to no longer join with the
wwv_flow_files_table:
- Under Regions, click on the name of the uploaded
files report.
- Replace the Region Source with the following:
select s.id,s.name,s.subject from file_subjects s
- Click Apply
Changes.
To change the download link to
use the new download procedure:
- Navigate to the Page Definition of page 2.
- Under Regions next to the uploaded files report
region, click Q.
- Next to the ID column, click the edit icon.
- Scroll down to the Column Link region.
- As shown in figure 12, in the URL field, replace
existing URL with the following
#OWNER#.download_my_file?p_file=#ID#.
- Click Apply
Changes.
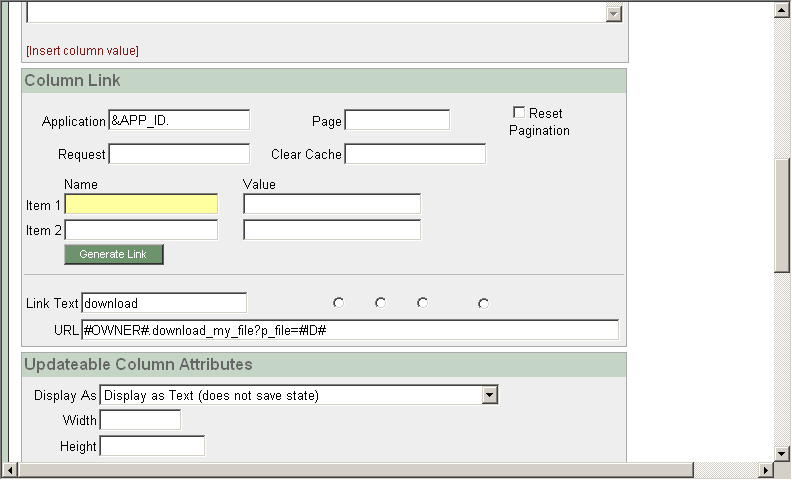
Figure 12: Change Download
URL
Feel free to discuss this
how-to in the OTN HTML DB
Discussion Forum.
|